Setting up to integrate and export to Sage 50 US - Time Ticket Register
This topic includes:
- How to Configure Sage 50 US for Integration with PayClock Online
- How to Configure Sage 50 US Employees for Integration with PayClock Online
- How to Install the Integration for Sage 50 US in PayClock Online
- How to Export PayClock Online Payroll Data and Import Payroll Date into Sage 50 US
- How to Read the Output File
How to Configure Sage 50 US for Integration with PayClock Online
Log into Sage 50 US and go to:
- File > Select Import/Export and click on the Time/Expense icon on the left.
- Click the Import button at the top, the Time Ticket Register window will open on the Fields tab.
- Scroll down the list of Fields and set them to match the list below. If the fields are not in the correct order the import will error.
| Field Name |
Column # |
| Employee / Vendor |
1 |
| Recorded by ID |
2 |
| Ticket Number |
3 |
| Ticket Date |
4 |
| Has Been Used in Sales / Invoicing |
5 |
| Invoice Number Used |
6 |
| Activity Item |
7 |
| Customer / Job / Adm |
8 |
| Completed for ID |
9 |
| Pay Level |
10 |
| Has Been Used in Payroll |
11 |
| Manual / Timed Option |
12 |
| Start Time |
13 |
| End Time |
14 |
| Break |
15 |
| Duration |
16 |
| Internal Memo |
17 |
| Billing Type |
18 |
| Billing Rate |
19 |
| Billing Status |
20 |
| Unit Duration |
21 |
| Billing Amount |
22 |
| Ticket Description for Invoicing |
23 |
- Go to the Options tab and set the path for the file under Import/Export File.
- Select “First Row Contains Headings” under Import Options.
- Click Save, enter a name for the saved template such as PCO Time Tickets.
- Click Save and OK. This will add a new entry to the list. This is the one to select when importing the file that will be created from PayClock Online.
How to Configure Sage 50 US Employees for Integration with PayClock Online
Log into Sage 50 US and:
- Click on the Employees & Payroll icon in the navigation list.
- Click on the Employees icon and select View and Edit Employees.
- Double click on the employee to open the Maintain Employees & Sales Reps window.
- Go to the Pay Info tab, set the Pay Method to “Hourly-Time Ticket Hours” and Save.
- Perform this change for each affected employee.
How to Install the Integration for Sage 50 US in PayClock Online
- In PayClock Online, go to Exports > Manage Exports.
- Click New, in the list find Sage 50 US – Time Ticket Register.
- From Add New Payroll Export select Setup Payroll Export.
- Select the pay class(s) to include in the integration and click Next. Note: For multiple pay classes the pay period start and end dates must be the same or the export will have to be done by Date Range.
- Enter the nickname and File Name.
- Enter the Default Activity Item and select Include Column Headers, click Next.
- Select the pay codes to map or include in the export and enter the Payroll Pay Type as defined in Sage 50, click Next. Note: Amount pay codes are not supported such as Tips, etc.
- Select which department(s) and set the Department Code to include in the export, click Next.
- Verify the configuration and click Save to complete the integration.
- The Sage 50 US integration will show in the list.
Activity Items Note – Activity items are used in Time & Billing. Activity items are used when recording time tickets. Activity items can be used when tracking hours worked in different departments. Activity items are setup as inventory items from the Maintain menu or the Navigation Aid. The user should contact Sage support if they have additional questions about the use of activity items.
Payroll Pay Type Note – When mapping PayClock Pay Codes to Sage 50 US Payroll Pay Types use the actual line number of the Sage 50 US Payroll Pay Types. For example, in Sage 50 US if the Regular Pay Type is on the first line of the list, the Payroll Pay Type number will be 1. The Payroll Pay Type number is the actual number of the row. To locate this information in Sage 50 US go to Maintain > Payroll > Payroll Settings >Company Information > Pay Types.
How to Export PayClock Online Payroll Data and Import Payroll Date into Sage 50 US
- In PayClock Online click on Exports, select the export from the list.
- At the export window, select a pay period or date range.
- Click Export Data and save the file.
- Log into Sage 50 US and choose File > Select Import/Export and click on the Time/Expense icon on the left.
- Click on the saved template (example; PCO Time Tickets) and then click Import.
- Verify the path on the Options tab and click OK.
- When the file has been imported, you’ll be ready to make any needed manual adjustments and then process the payroll.
Note: Please contact your payroll provider if there are any questions when processing your payroll.
How to Read the Output File for Sage 50 US
| Col # |
Field Name |
Field Description |
| 1 |
Employee / Vendor |
Always 0 (zero) |
| 2 |
Recorded by ID |
Employee Number |
| 3 |
Ticket Number |
Unique number created by PCO |
| 4 |
Ticket Date |
Date of the daily total |
| 5 |
Has Been Used in Sales / Invoicing |
Not Used - Blank |
| 6 |
Invoice Number Used |
Not Used - Blank |
| 7 |
Activity Item |
Default Activity item # or Worked Department Number |
| 8 |
Customer / Job / Adm |
Always 3 |
| 9 |
Completed for ID |
Not Used - Blank |
| 10 |
Pay Level |
Payroll Pay Type ID |
| 11 |
Has Been Used in Payroll |
Always False |
| 12 |
Manual / Timed Option |
Always 1 |
| 13 |
Start Time |
Not Used - Blank |
| 14 |
End Time |
Not Used - Blank |
| 15 |
Break |
Not Used - Blank |
| 16 |
Duration |
Amount of time worked (HH:MM) |
| 17 |
Internal Memo |
Not Used - Blank |
| 18 |
Billing Type |
Always 0 |
| 19 |
Billing Rate |
Always 0.00000 |
| 20 |
Billing Status |
Always 2 |
| 21 |
Unit Duration |
Time worked converted to decimal format |
| 22 |
Billing Amount |
Always 0.00 |
| 23 |
Ticket Description for Invoicing |
Not Used - Blank |
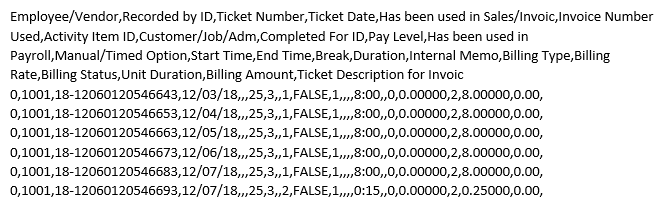
Sample Output File for Sage 50 US
Wed 12/05/2018